
Plan voor Home Assistant Lux sensor via MQTT
To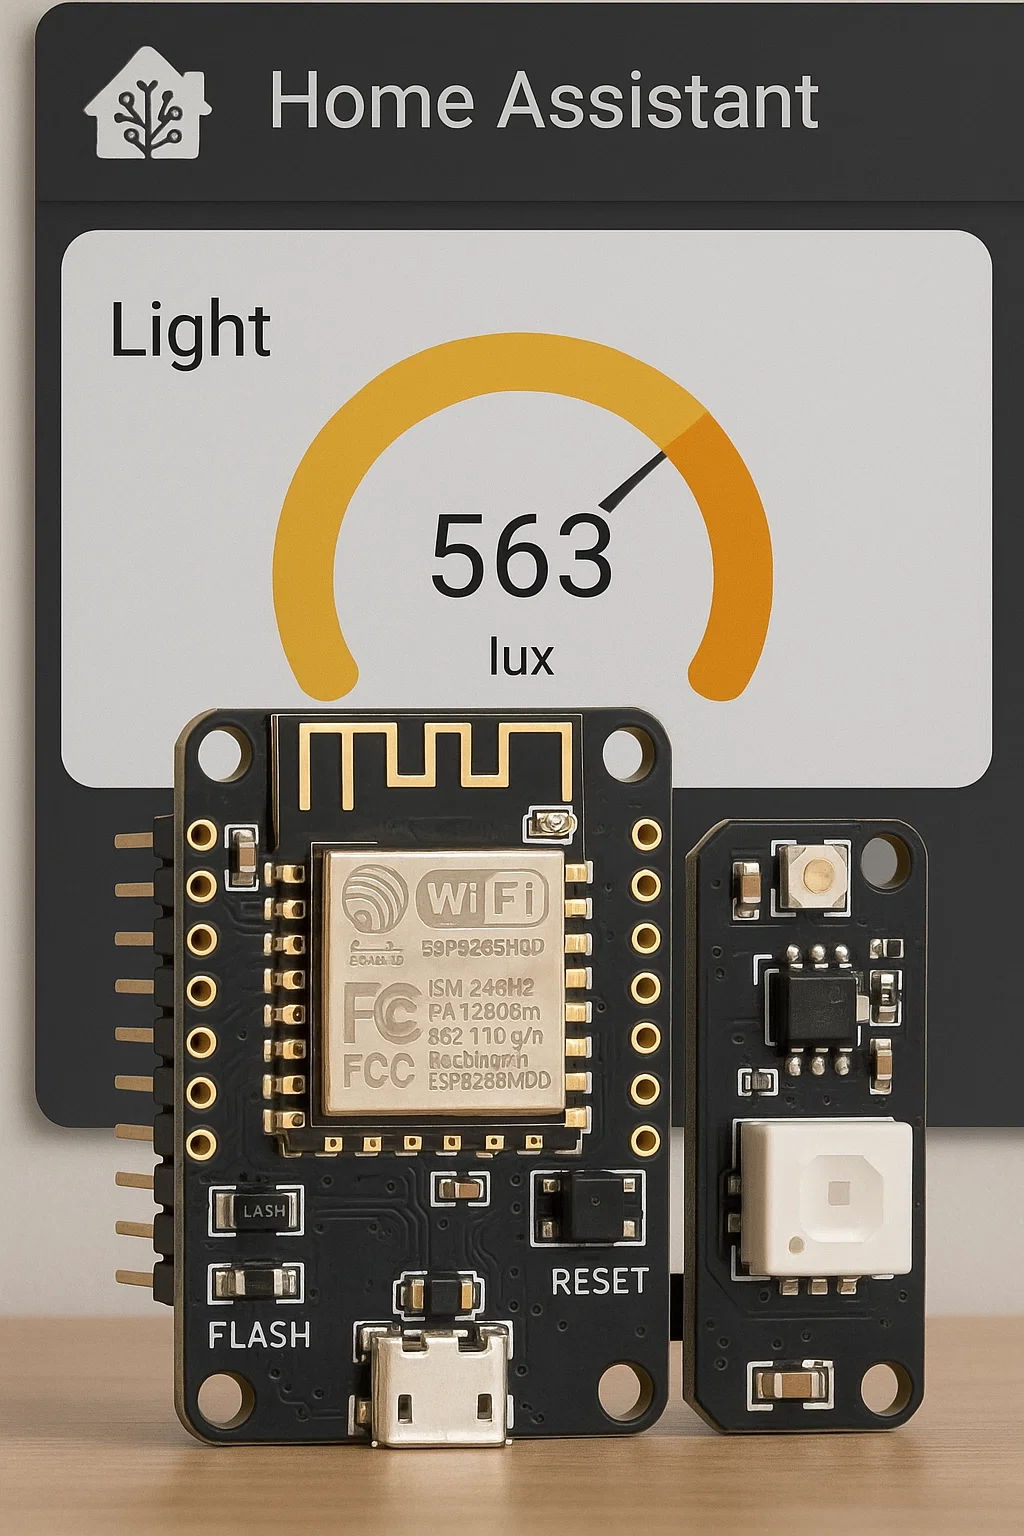
Uiteraard! modifyHieronder theis providedhet Arduinovolledige projectplan, inclusief de Arduino-code zoals in je oorspronkelijke tekst. De code foris thenetjes opgemaakt in een codeblok en voorzien van commentaar:
🌟 Projectplan: ESP8266 RGB LED & Lichtsensor met MQTT-integratie in Home Assistant
🧰 Hardware
Onderdeel | Specificatie / Functie |
|---|---|
ESP8266 Module | Witty Cloud ESP-12F |
Sensoren | -
|
Voeding | Micro-USB |
|
|
🛠️ Firmware & Configuratie
📦 Firmware
- Basis:
-EigenSubscribefirmwareto an MQTT topic (e.g., `heldenhome/switch/esp8266_rgbled/set`) to receive commands (`ON` or `OFF`) from Home Assistant.3. **Update Home Assistant Configuration**:- Add a manual MQTT switch entitygeschreven in`configuration.yaml` to control the RGB LED.4. **Retain Light Sensor Functionality**:- Keep the existing LDR sensor code to publish light intensity every 5 seconds.Below is the updatedArduinocode that adds RGB LED control via MQTT, along with a plan to integrate it with Home Assistant.### Plan for RGB LED Control1. **Modify Arduino Code**IDE - Bibliotheken:
- Define pins for the RGB LED.ESP8266WiFi.h- Add an MQTT subscription to a topic for LED control.PubSubClient.h- Implement a callback function to process `ON`/`OFF` commands.- Turn all RGB LED pins on/off together for simplicity (treating it as a single white LED).2. **Update Home Assistant**:- Add an MQTT switch entity in `configuration.yaml` to control the LED.3. **Test**:- Verify LED control via Home Assistant and ensure light sensor data continues to work.### Updated
📄 Arduino Code
The code below extends the original code to include RGB LED control. It subscribes to `heldenhome/switch/esp8266_rgbled/set` for `ON`/`OFF` commands and controls the RGB LED pins accordingly.
```x-arduino
#include <ESP8266WiFi.h>
#include <PubSubClient.h>
#include
<ArduinoJson.h>
// WiFiNetwerkgegevens
en MQTT instellingen
const char* ssid = "ORBI09"jouw_ssid";
const char* password = "heldeninit"jouw_wachtwoord";
// MQTT broker
const char* mqtt_server = "192.168.15.254"mqtt_broker_ip";
const int mqtt_port = 1883;
const char* mqtt_user = "MQTTBroker"mqtt_gebruiker";
// indien van toepassing
const char* mqtt_password = "Helden#123"mqtt_wachtwoord";
const
char* mqtt_client_id = "ESP8266_LightSensor";
const char* discovery_prefix = "heldenhome";
// MQTT topics
const char* light_state_topiclicht_topic = "heldenhome/sensor/esp8266_lightsensor/state"esp8266_licht/lux";
const char* light_config_topicrgb_topic = "heldenhome/sensor/esp8266_lightsensor/config";
const char* led_command_topic = "heldenhome/switch/light/esp8266_rgbled/set";
const
char* led_state_topic = "heldenhome/switch/esp8266_rgbled/state";
// LDR pin
#define LDR_PIN A0
// RGB LED pinspinnen
(active-low)
#defineconst LED_REDint 15
#defineredPin LED_GREEN= 12
#define15;
LED_BLUEconst 13
int greenPin = 12;
const int bluePin = 13;
// WiFiLDR enpin
MQTTconst clients
int ldrPin = A0;
WiFiClient espClient;
PubSubClient client(espClient);
//
Tijdbeheer
unsigned long lastMsg = 0;
const long interval = 5000; // 5 seconden interval
void setup_wifi() {
delay(10);
Serial.println("Verbinden met WiFi...");
WiFi.begin(ssid, password);
while (WiFi.status() != WL_CONNECTED) {
delay(500);
Serial.print(".");
}
Serial.println("");
Serial.println("WiFi verbonden");
Serial.println("IP adres: ");
Serial.println(WiFi.localIP());
}
void publish_discovery() {
// Maak een JSON object voor de lichtsensor discovery configuratie
StaticJsonDocument<512> config;
config["name"] = "ESP8266 Lichtsensor";
config["device_class"] = "illuminance";
config["unit_of_measurement"] = "lx";
config["state_topic"] = light_state_topic;
config["value_template"] = "{{ value_json.lux
}}";
config["unique_id"] = "esp8266_lightsensor";
config["device"]["identifiers"] = "esp8266_lightsensor";
config["device"]["name"] = "ESP8266 Lichtsensor";
config["device"]["model"] = "Witty Cloud ESP-12F";
config["device"]["manufacturer"] = "Gizwits";
char buffer[512];
serializeJson(config, buffer);
client.publish(light_config_topic, buffer, true);
Serial.println("Lichtsensor discovery bericht verzonden");
}
void callback(char* topic, byte* payload, unsigned int length) {
// Verwerk inkomende MQTT berichten
String message;
json = "";
for (unsigned int i = 0; i < length; i++) {
messagejson += (char)payload[i];
}
Serial.print("BerichtStaticJsonDocument<256> ontvangendoc;
opDeserializationError topicerror [")= deserializeJson(doc, json);
Serial.print(topic);
if Serial.print("]:(error) ");
Serial.println(message);
// Controleer of het bericht voor de LED is
return;
if (String(topic) == led_command_topic)rgb_topic) {
if (message == doc["ON") {
digitalWrite(LED_RED, LOW); // Active-low: LOW = aan
digitalWrite(LED_GREEN, LOW);
digitalWrite(LED_BLUE, LOW);
client.publish(led_state_topic, "ON", true);
Serial.println("RGB LED aangezet");
} else if (messagestate"] == "OFF") {
digitalWrite(LED_RED,analogWrite(redPin, HIGH)0);
//analogWrite(greenPin, Active-low:0);
HIGHanalogWrite(bluePin, 0);
} else {
int brightness = uit
doc["brightness"] digitalWrite(LED_GREEN,| HIGH)255;
JsonObject color = doc["color"];
digitalWrite(LED_BLUE,int HIGH);
r client.publish(led_state_topic,= color["OFF",r"] true);
| Serial.println(0;
int g = color["RGBg"] LED| uitgezet"0;
int b = color["b"] | 0;
analogWrite(redPin, map(r * brightness / 255, 0, 255, 0, 1023));
analogWrite(greenPin, map(g * brightness / 255, 0, 255, 0, 1023));
analogWrite(bluePin, map(b * brightness / 255, 0, 255, 0, 1023));
}
}
}
void reconnect() {
while (!client.connected()) {
Serial.print("Verbinden met MQTT...");
if (client.connect(mqtt_client_id,"ESP8266Client", mqtt_user, mqtt_password)) {
Serial.println("verbonden");
// Publiceer discovery bericht
publish_discovery();
// Abonneer op LED commando topic
client.subscribe(led_command_topic)rgb_topic);
Serial.println("Geabonneerd op LED commando topic");
} else {
Serial.print("mislukt, rc=");
Serial.print(client.state());
Serial.println(" probeer opnieuw in 5 seconden");
delay(5000);
}
}
}
void setup() {
Serial.begin(115200);
// Initialiseer RGB LED pins
pinMode(LED_RED,redPin, OUTPUT);
pinMode(LED_GREEN,greenPin, OUTPUT);
pinMode(LED_BLUE,bluePin, OUTPUT);
// Zet LED uit bij opstarten
digitalWrite(LED_RED, HIGH);
digitalWrite(LED_GREEN, HIGH);
digitalWrite(LED_BLUE, HIGH);
setup_wifi();
client.setServer(mqtt_server, 1883)mqtt_port);
client.setCallback(callback);
}
void loop() {
if (!client.connected()) {
reconnect();
}
client.loop();
unsignedint long nowlichtWaarde = millis()analogRead(ldrPin);
ifchar (nowmsg[8];
-dtostrf(lichtWaarde, lastMsg1, >2, interval)msg);
{
client.publish(licht_topic, lastMsgmsg);
= now;
delay(10000); // Leeselke LDR10 waarde
seconden verzenden
}🔧
intLetldr_valueop:= analogRead(LDR_PIN);
// Converteer naar een geschatte lux waarde
float lux = map(ldr_value, 0, 1023, 0, 1000);
// Maak JSON payload
StaticJsonDocument<200> doc;
doc["lux"] = lux;
char buffer[200];
serializeJson(doc, buffer);
// PubliceerVoeg delichtsterktejuiste
client.publish(light_state_topic,WiFi-buffer,entrue);
Serial.print("Lichtsterkte gepubliceerd: ");
Serial.println(buffer);
}
}
```
### Changes Made to the Code
1. **Added RGB LED Pins**:
- Defined `LED_RED` (15), `LED_GREEN` (12), and `LED_BLUE` (13).
- Initialized as outputsMQTT-gegevens in`setup()`vóórandgebruik.setZorgtoook`HIGH`dat de JSON-library (off)ArduinoJson)atisstartup.geïnstalleerd via de Library Manager.
2. **Added
📡 MQTT Topics for LED**:
Functie | Topic | Type |
|---|---|---|
Lichtintensiteit |
|
|
|
|
|
🏠 Home Assistant feedback.Configuratie (configuration.yaml4.
)
4.
🧭 **SubscribedMQTT to LED Topic**:
Sensorsensor:
- Addedplatform: `client.subscribe(led_command_topic)` in `reconnect()`.
5. **Kept Light Sensor Functionality**:
- The LDR reading and publishing to `heldenhome/sensor/esp8266_lightsensor/state` remain unchanged.
### Home Assistant Configuration
Since MQTT Discovery didn’t work previously, add the LED as a manual MQTT switch in `configuration.yaml` to match the manual sensor configuration. Update your `configuration.yaml` as follows:
```yaml
mqtt:
sensor:
-mqtt
name: "ESP8266Lichtniveau Lichtsensor"
ESP8266"
state_topic: "heldenhome/sensor/esp8266_lightsensor/state"
value_template: "{{ value_json.lux }}"
esp8266_licht/lux"
unit_of_measurement: "lx"
lux"
device_class: "illuminance"
illuminance
unique_id: "esp8266_lightsensor"
esp8266_lichtsensor_1🎨
switch:
MQTT Light (RGB LED)light:
- platform: mqtt
name: "ESP8266 RGB LED"
command_topic: "heldenhome/switch/light/esp8266_rgbled/set"
state_topic: "heldenhome/switch/light/esp8266_rgbled/state"
state_on:schema: "ON"
json
state_off:brightness: "OFF"
true
payload_on:rgb: "ON"
payload_off: "OFF"
true
unique_id: "esp8266_rgbled"
```
-esp8266_rgb_led_1
📈 **Save** the file and **restart Home Assistant** (**Settings** > **System** > **Restart**).
- The switch will appear as `switch.esp8266_rgb_led` in Home Assistant.
### Setup and Testing
1. **Upload the Code**:
- Copy the updated code into Arduino IDE.
- Select the board (**NodeMCU 1.0 (ESP-12E Module)**) and port.
- Upload and open the Serial Monitor (115200 baud) to verify:
- WiFi connection (“WiFi verbonden”).
-Voorbeeld MQTT connection (“Verbinden met MQTT…verbonden”).
- Subscription to LED topic (“Geabonneerd op LED commando topic”).
- Light intensity publishing (“Lichtsterkte gepubliceerd”).
2. **Test the LED**:
- In Home Assistant, go to **Settings** > **Devices & Services** > **Entities**.
- Find `switch.esp8266_rgb_led` and toggle it.
- ThePayloads💡 RGB LED
should turn onAanzetten (whitegeelachtig light, as all colors are activated) or off.
Topic: - Check the Serial Monitor for messages like “RGB LED aangezet” or “RGB LED uitgezet”.heldenhome/light/esp8266_rgbled/set
Payload:
3. **Verify Light Sensor**:
- Ensure `sensor.esp8266_lichtsensor` still updates with lux values every 5 seconds.
4. **Test with MQTT Explorer** (optional):
- Publish `ON` or `OFF` to `heldenhome/switch/esp8266_rgbled/set`:
```bash
mosquitto_pub -h 192.168.15.254 -u MQTTBroker -P Helden#123 -t
,
"brightness": 200,
"color": { "r": 255, "g": 255, "b": 100 }
}{
"heldenhome/switch/esp8266_rgbled/set" -mstate": "ON"
🔴 Uitschakelen
{
  "state": "OFF"
}
🚀 Uitbreidingsideeën
Idee | Beschrijving |
|---|---|
🔴 Individuele
| Losse |
🌙 |
|
📉 | Empirische |
📲
| WiFi |
✅ SerialStatus
Onderdeel | Status |
|---|---|
Hardware | ✔️ |
Firmware | ✔️ |
MQTT-verbinding |
|
|
|
### Notes
- The RGB LED is treated as a single switch (all colors on/off together). To control individual colors, additional topics and logic can be added.
- If you want to revisit MQTT Discovery for the LED, add a discovery message in `publish_discovery()` similar to the sensor, but this requires troubleshooting why discovery failed previously.
LetLaat me knowweten ifals youje needdit furtherwilt modifications,als likePDF individualof RGBMarkdown-bestand, colorof controlals orje deephet sleepwilt integration!omzetten naar een poster, presentatie of GitHub README!